
Punching leather in an apartment with a mallet and a striking awl is the best way to receive a note from the neighbor before finishing your first stitch. The noise, misaligned holes, and the leather that deforms: these are common issues for most beginners. However, leather perforation relies on simple choices, provided you understand how the material reacts according to the tool, the support, and the preparation.
Striking surface and leather perforation: the detail that the tool alone does not solve
First, we think of the hole punch or the stitching awl. The support on which the leather is placed matters just as much. A board that is too hard (marble, glass) breaks the tip of the tool and crushes the fibers instead of cutting them. A board that is too soft absorbs the energy and requires harder strikes, which deforms the piece.
See also : How to Easily Convert 150g to ml: Tips and Practical Advice in Cooking
Polyurethane plates designed for perforation offer the best compromise. They absorb the shock without denting and extend the lifespan of the blades. This type of support can be found from manufacturers like Kyoshin Elle. A classic cutting mat for rotary cutters can also be suitable for thin leathers, but it degrades quickly with round hole punches.
For those looking for more leather perforation tips on Zazie Web, the question of support is also addressed from a practical angle.
Read also : How to Identify an Unknown Caller: Effective Tips and Legal Solutions
Testing the support on a scrap before tackling the final piece avoids unpleasant surprises. A clean hole on the grain side but torn on the exit almost always indicates an unsuitable support.
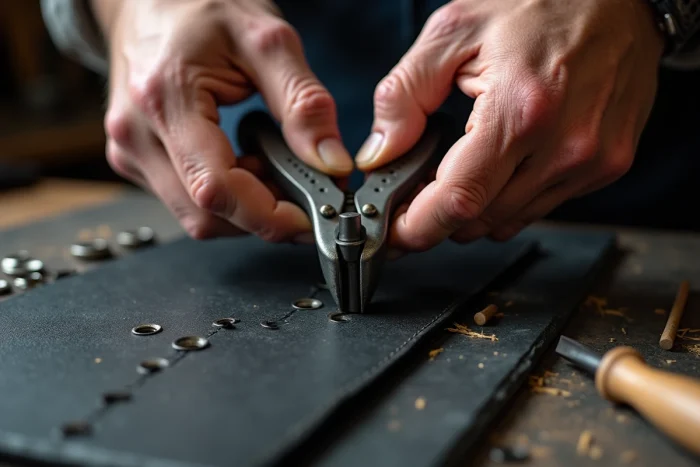
Manual press or mallet: choosing the perforation tool according to workshop constraints
The nylon mallet on a striking awl remains the most common method in tutorials. It works well in a garage or isolated workshop. In an apartment, the problem is real: each strike transmits through the slab and the walls.
In recent years, compact manual presses with gear reduction have appeared on the market (Craftplus, Weaver Leather Supply). The principle is simple: a lever amplifies the force exerted by the hand, and the pressure is applied gradually rather than by impact.
- Presses allow for cleanly perforating leathers of 3 to 4 mm thickness without significant noise, making them suitable for a home workshop.
- They accept most standard hole punches and interchangeable tooth awls.
- The cost remains higher than a mallet, but you gain consistency on series (belts, bracelets, long stitches).
For occasional use, the mallet is sufficient. Once you start making multiple holes on the same piece, the press changes the outcome because it maintains a constant angle and uniform pressure.
Moistening leather before perforation: a technique that depends on tanning
Lightly moistening the leather before piercing is known as “casing” in leatherwork. The idea is to make the fibers more supple so that the tool cuts them cleanly instead of tearing them.
On vegetable-tanned leather, the result is clear: the holes are cleaner, the edges remain smooth, and the hole punch penetrates with less effort. You moisten the flesh side with a sponge, then wait for the water to be absorbed without the surface still shining. The leather should feel cool to the touch, not wet.
Chrome-tanned leather: caution on moistening
Feedback varies on this point. Tests documented by Tandy Leather show that moistening soft chrome leather tends to cause more tearing and sometimes tears around the hole. Chrome leather, already softer by nature, does not need this additional softening. It is recommended to perforate it dry, simply ensuring that you use a well-sharpened tool.
Templates and marking: perforating straight on thick leather
Getting evenly spaced holes along a stitching line is where many projects go off track. Marking with a dry-point compass on the grain side leaves visible marks if you deviate. The most reliable solution remains a rigid template.
3D printed templates are developing in amateur leatherworker communities. A pattern is modeled with the perforations already positioned, printed in rigid PLA, and used as a guide to mark each hole before striking. The main benefit: the consistency of spacing becomes reproducible from one piece to another.
For those without a 3D printer, a metal ruler and a wheel compass do the job. You draw a stitching line parallel to the edge with an adjustable tracer (wheel awl), then mark the intervals with the compass before perforating.
Perforation on thick leather: working both sides
On leather thicker than 4 mm, a single pass from the grain side often produces a clean hole on the surface but blown out on the exit. The method involves perforating to mid-depth from each side while aligning the holes. You mark both sides with the same template, first perforating the grain side, then flipping the piece to finish on the flesh side.
This technique requires precise alignment. Securing the template with repositionable masking tape helps avoid shifting the points between the two sides.
Maintenance of perforation tools: regular sharpening changes the quality of holes
A hole punch or awl that tears fibers instead of cutting them has simply lost its sharpness. On vegetable leather, this is quickly noticeable: the edges of the hole are fibrous instead of clean. On chrome leather, the hole becomes slightly oval.
- Sharpen round hole punches with a conical wooden mandrel coated with abrasive paste, turning the tool by hand.
- For tooth awls, a pass on fine leather loaded with polishing paste is enough to restore the edge.
- Replace the tool when sharpening no longer restores a clean edge: a worn awl costs less than a failed project.
Storing perforation tools tip-up in a block or case protects the edge between sessions. Laying an awl flat in a toolbox mixed with other metal objects is the surest way to dull it without using it.